Algorithm101 是我在 Github 上新开的 Repo,目的是边学习边总结一些基本的数据结构和算法。
万丈高楼平地起,让我们开始吧。
Linked List
链表的学习应该是所有人第一次开始对数据结构有一个清晰的认知。无论是单向链表、双向链表、循环链表还是 Dummy Node 这样的小技巧,我相信大家都已经了然于胸,本节我关注的重点放在工业代码对链表的实现以及并发链表等内容上。
List in C++
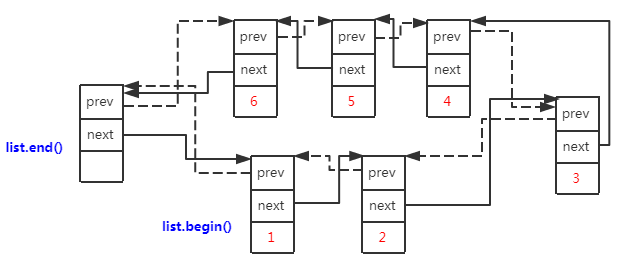
std::list 是 STL 提供的双向链表容器。
std::list<int> l = {2, 3, 4};
l.push_front(1);
l.push_back(5);
// 1, 2, 3, 4, 5
下面以 SGI-STL(clang 的实现可读性实在是不高) 源码来分析 std::list 的实现。
template <class _Tp, class _Alloc>
class list : protected _List_base<_Tp, _Alloc> {
	// 迭代器类型
	typedef _List_iterator<_Tp, _Tp&, _Tp*>  iterator;
};

template <class _Tp, class _Alloc>
class _List_base {
  // List 中维护一个 dummy node
  _List_base(const allocator_type&) {
    _M_node = _M_get_node();
    _M_node->_M_next = _M_node;
    _M_node->_M_prev = _M_node;
  }
	// 唯一的数据成员
	_List_node<_Tp>* _M_node;
};

// 实际链表节点结构
template <class _Tp>
struct _List_node : public _List_node_base {
	// 数据
	_Tp _M_data;
};

struct _List_node_base {
	// 指针
	_List_node_base* _M_next;
	_List_node_base* _M_prev;
};

struct _List_iterator : public _List_iterator_base {
	typedef _List_node<_Tp> _Node;
	_List_iterator(_Node* __x) : _List_iterator_base(__x) {}
}
// List 的迭代器实际上就是指向 _List_node<_Tp> 的指针
struct _List_iterator_base {
	_List_node_base* _M_node;
}
可以看到虽然实现略有复杂,但是抽象出来的底层结构就是一般的带 dummy node 的双向循环链表,而 std::list 的迭代器就是指向节点的指针。
下面摘出几个关键函数来看具体实现
// 返回 dummy node-> next 节点的指针
iterator begin()             { return (_Node*)(_M_node->_M_next); }
// empty 代表只有 dummy node
bool empty() const { return _M_node->_M_next == _M_node; }

// 嗯。。符合预期
iterator insert(iterator __position, const _Tp& __x) {
	_Node* __tmp = _M_create_node(__x);
	__tmp->_M_next = __position._M_node;
	__tmp->_M_prev = __position._M_node->_M_prev;
	__position._M_node->_M_prev->_M_next = __tmp;
	__position._M_node->_M_prev = __tmp;
	return __tmp;
}

// List 的排序,merge sort 的迭代版本,实在是精巧。
template <class _Tp, class _Alloc>
void list<_Tp, _Alloc>::sort()
{
  	// Do nothing if the list has length 0 or 1.
  	if (_M_node->_M_next != _M_node && _M_node->_M_next->_M_next != _M_node) {
    	list<_Tp, _Alloc> __carry;
    	list<_Tp, _Alloc> __counter[64];
    	int __fill = 0;
    	while (!empty()) {
    		// 取待排序队首元素放到 carry 中
      		__carry.splice(__carry.begin(), *this, begin());
      		int __i = 0;
      		while(__i < __fill && !__counter[__i].empty()) {
      			// 如果 counter 当前下标有已排序列表,进行 merge
        		__counter[__i].merge(__carry);
        		// 交换,看下一个位置是否也如此
        		__carry.swap(__counter[__i++]);
      		}
      		// 一轮归并、排序完毕,放回 counter 何时的位置
      		__carry.swap(__counter[__i]);
      		if (__i == __fill) ++__fill;
    	}
    	// 将 counter 中所有元素 merge 后,得到最终排序列表
    	for (int __i = 1; __i < __fill; ++__i)
      		__counter[__i].merge(__counter[__i-1]);
    	swap(__counter[__fill-1]);
  	}
}

template<class _Tp, class _Ref, class _Ptr>
struct _List_iterator : public _List_iterator_base {
	// 解引用重载
	reference operator*() const { return ((_Node*) _M_node)->_M_data; }

	// void _M_incr() { _M_node = _M_node->_M_next; }
	// 左++
	_Self& operator++() {
		this->_M_incr();
		return *this;
	}
	// 右++
	_Self operator++(int) {
		_Self __tmp = *this;
		this->_M_incr();
		return __tmp;
	}
};
List in Go
container/list提供了 Go 标准库对链表的实现。与 STL 类似,这也是一个携带 dummy node 的双向循环链表,得益于 interface{} 的存在,container/list 的实现非常简洁:
type Element struct {
	next, prev *Element

	// The list to which this element belongs.
	list *List

	// The value stored with this element.
	Value interface{}
}

func (e *Element) Next() *Element {
	if p := e.next; e.list != nil && p != &e.list.root {
		return p
	}
	return nil
}

type List struct {
	root Element // sentinel list element, only &root, root.prev, and root.next are used
	len  int     // current list length excluding (this) sentinel element
}

func (l *List) Init() *List {
	l.root.next = &l.root
	l.root.prev = &l.root
	l.len = 0
	return l
}

func (l *List) insert(e, at *Element) *Element {
	n := at.next
	at.next = e
	e.prev = at
	e.next = n
	n.prev = e
	e.list = l
	l.len++
	return e
}
这段代码没啥可说的,就是双向循环链表的标准化实现。
Intrusive List
以上链表的实现都是我们再课本里学到的,这种实现可以简单描述为:
struct ListNode {
	ListNode* prev;
	Listnode* next;
	_Tp data;
};

class LinkedList {
	ListNode dummy;
	// ...
};
这种实现的思想是将数据data放到链表节点中。但是这有几个问题:
- 删除某个特定数据对应的节点操作是 O(n) 的(因为我们需要遍历整个链表,确定这个data所对应的节点)。
- 限制了自由度,比如说某个
data对应于多个链表节点(链表内部细节被掩盖了)。 - 取出数据往往需要两次指针解引用操作(iterator -> val -> data,因为我们的data往往是复杂的数据结构,以指针形式放在链表中)
于是便有了 Intrusive List(介入式链表),它的实现看上去为:
struct ListNode {
	ListNode* prev;
	ListNode* next;
};

class MyData {
	int data1;
	double data2;
	// ...
	ListNode node;
};
这样子,链表节点实际上是包含在数据 data 中了。带来的好处也是显而易见的,用户直接操作的就是数据,将数据从链表中摘除的时间复杂度是 O(1) 的。
最有名的 Intrusive List 实现在 Linux Kernel 中,Linux Kernel Linked List Explained对其做了详细解释。
源码在 linux/include/linux/list.h中,整体实现非常简洁,这里不再花过多篇幅。唯一需要注意的是,我们通过 Intrusive List 遍历得到的是
struct list_head {
	struct list_head *next, *prev;
};
我们如何通过这个得到我们原始的 data 呢?答案在 list_entry 这个宏里:
#define list_entry(ptr, type, member) \
	((type *)((char *)(ptr)-(unsigned long)(&((type *)0)->member)))
简单来说,&((type *)0)->member 这样子就得到了 member(也就是 list_head)在整个 MyData 结构里相对于虚拟地址 0 的偏移量,然后将实际list_head的地址减去该偏移量就得到了 MyData 的地址。
google/netstack这个项目中用 Go 实现了 Intrusive List,利用 interface 避免了 C 中指针转换的尴尬,代码在 netstack/ilist/list.go。
Concurrent Linked List
TODO